

The punch didn’t mushroom. It didn’t slowly wear out. It snapped.
Half-inch plate. Bottom bending, not air bending. The operator swore the tonnage chart said he was inside limits. The chromoly punch had run mild steel for years without complaint. Then one shift, under a load that looked “legal” on paper, the tip let go and peppered the die space with fragments. I’ve seen it happen.
If 42CrMo is the industry’s safe bet, why does it behave like a middleweight stepping into a heavyweight ring when tonnage per foot climbs? The answer often isn’t just metallurgy—it’s the press brake system itself. In high-tonnage scenarios, frame rigidity, CNC-controlled force distribution, and alignment accuracy determine whether tooling stays within real limits or drifts into destructive stress zones. Exploring how a fully CNC-based solution like the CN-HAWE press brake is engineered for demanding bending applications helps reframe the question from “Is this tool strong enough?” to “Is the entire bending system built for this load?”
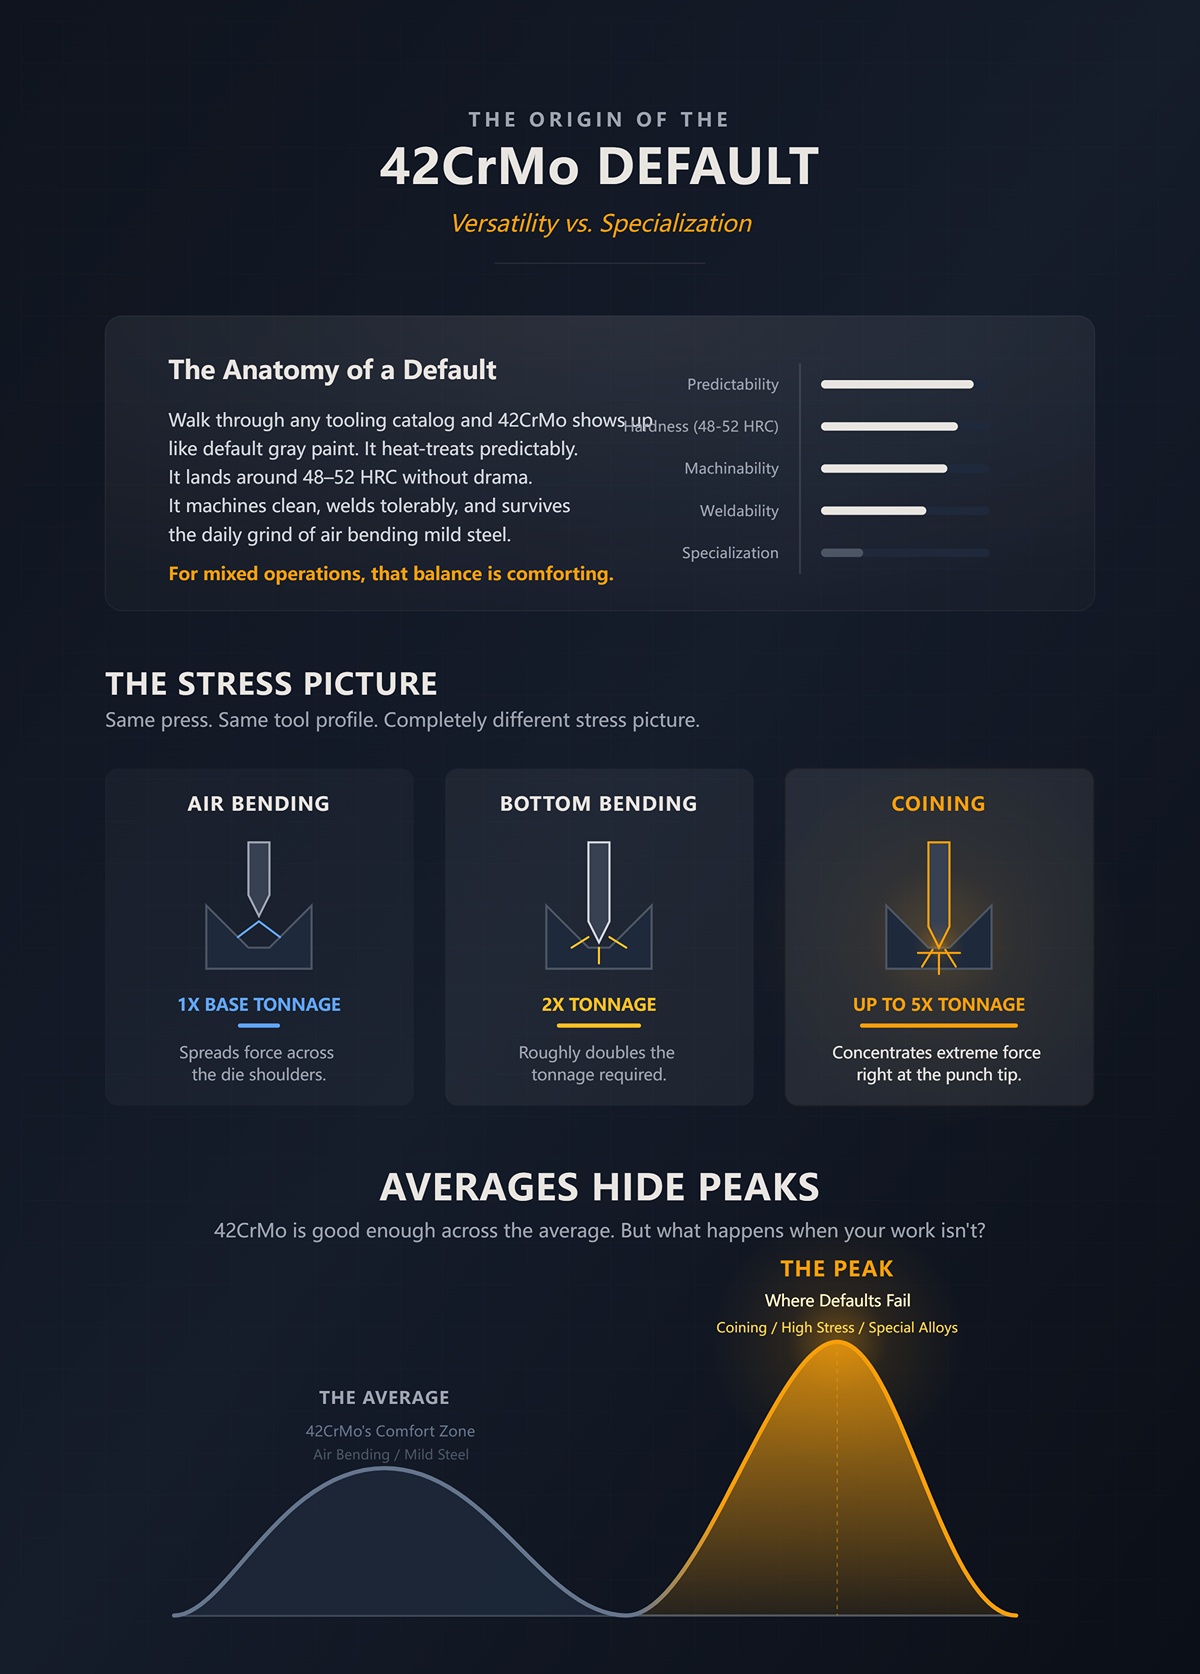
Walk through any tooling catalog and 42CrMo shows up like default gray paint. It heat-treats predictably. It lands around 48–52 HRC without drama. It machines clean, welds tolerably, survives the daily grind of air bending mild steel. For shops running mixed gauges and materials, that balance is comforting.
Because most bending is air bending.
Air bending spreads force across the die shoulders. Bottom bending roughly doubles the tonnage. Coining can demand up to five times more, concentrating force right at the punch tip. Same press. Same tool profile. Completely different stress picture. Yet the alloy choice rarely changes with the method.
That’s how 42CrMo became king: it’s good enough across the average. But averages hide peaks. What happens when your work isn’t average?
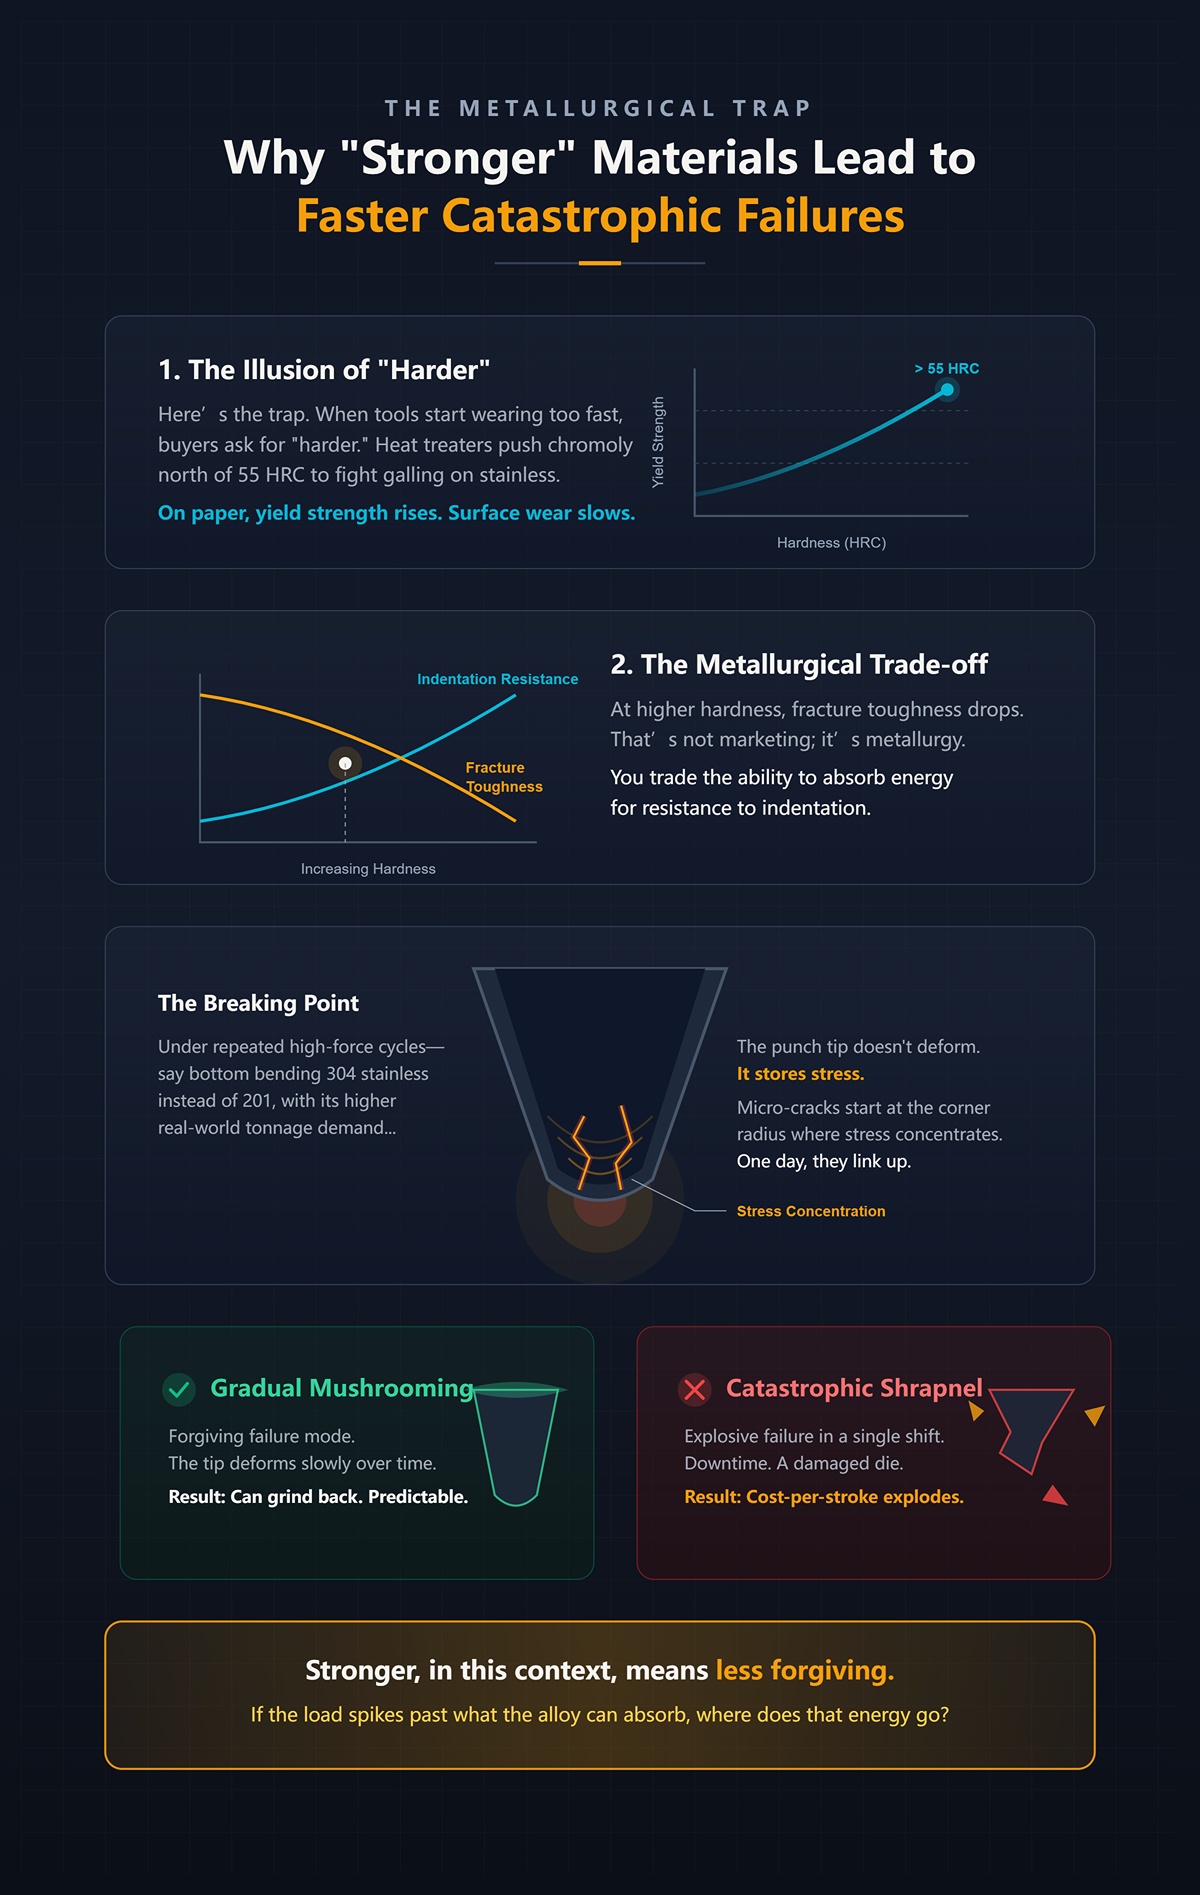
Here’s the trap. When tools start wearing too fast, buyers ask for “harder.” Heat treater pushes the chromoly north of 55 HRC to fight galling on stainless. On paper, yield strength rises. Surface wear slows.
Then the heavy job hits.
At higher hardness, fracture toughness drops. That’s not marketing; it’s metallurgy. You trade the ability to absorb energy for resistance to indentation. Under repeated high-force cycles—say bottom bending 304 stainless instead of 201, with its higher real-world tonnage demand—the punch tip doesn’t deform. It stores stress. Micro-cracks start at the corner radius where stress concentrates. One day, they link up.
And instead of gradual mushrooming you can grind back, you get shrapnel. Downtime. A damaged die. Cost-per-stroke explodes in a single shift.
Stronger, in this context, means less forgiving. If the load spikes past what the alloy can absorb, where does that energy go?
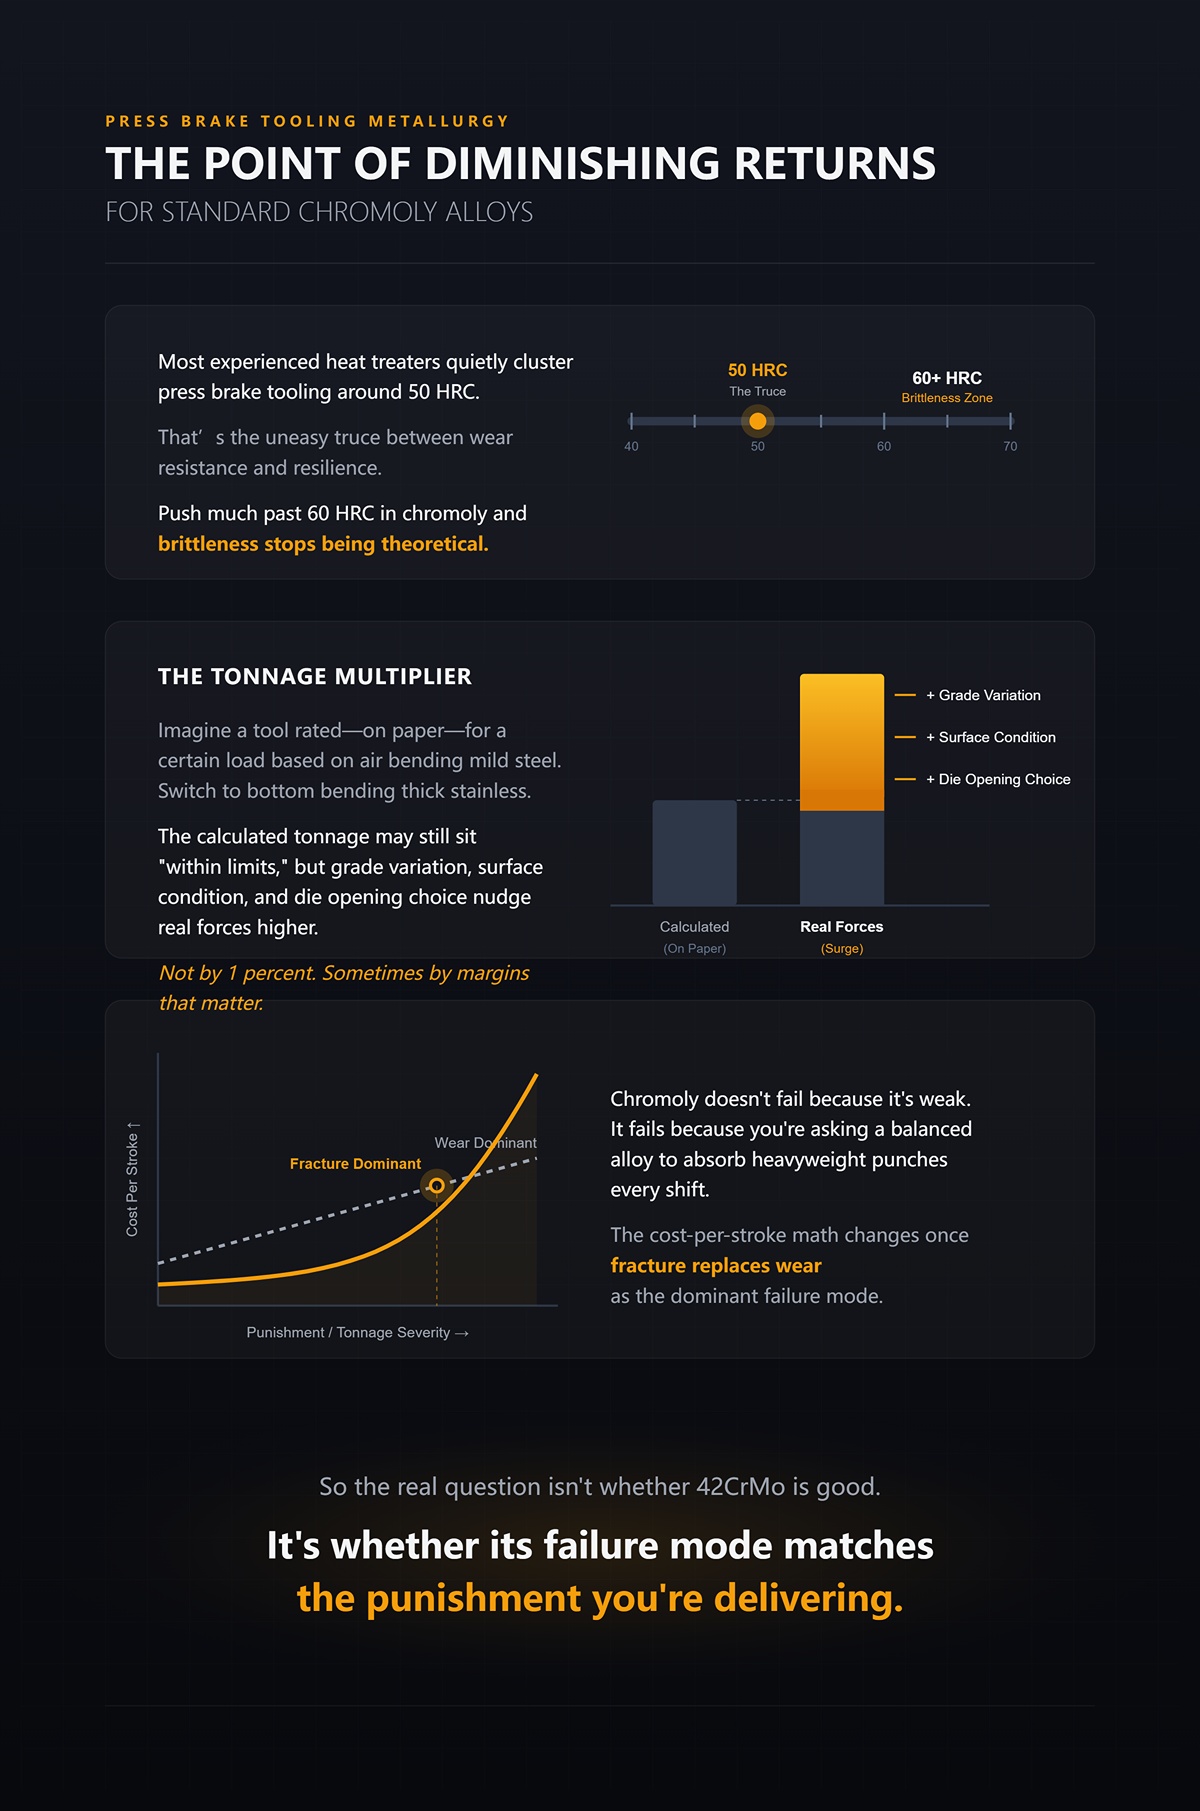
Most experienced heat treaters quietly cluster press brake tooling around 50 HRC. That’s the uneasy truce between wear resistance and resilience. Push much past 60 HRC in chromoly and brittleness stops being theoretical.
Now layer in tonnage per foot.
Imagine a tool rated—on paper—for a certain load based on air bending mild steel. Switch to bottom bending thick stainless. The calculated tonnage may still sit “within limits,” but grade variation, surface condition, and die opening choice nudge real forces higher. Not by 1 percent. Sometimes by margins that matter.
Chromoly doesn’t fail because it’s weak. It fails because you’re asking a balanced alloy to absorb heavyweight punches every shift. The cost-per-stroke math changes once fracture replaces wear as the dominant failure mode.
So the real question isn’t whether 42CrMo is good.
It’s whether its failure mode matches the punishment you’re delivering.
On one bench I had two retired punches from the same press. Both ran thick stainless on night shift. One had a rounded nose you could measure with a caliper—about 0.4 mm of mushrooming. The other was missing its tip entirely. The first went to regrind and came back to work. The second sent fragments into the die cavity and scarred the shoulders.
Same machine. Similar tonnage. Completely different endings.
That’s the fork in the road once you stop worshipping hardness numbers. You are not choosing between “strong” and “weak.” You are choosing between a tool that yields slowly and one that releases stored energy all at once. One costs you scheduled maintenance. The other carries shrapnel risk. I’ve seen it happen.
If profitability is measured in cost-per-stroke, the punch that deforms predictably can still win the heavyweight bout. The one that fractures spectacularly might have looked tougher on a brochure, but it exits the ring in pieces. So what actually drives a tool toward one fate or the other?
Look at a punch that’s been air bending mild steel for months. The nose is polished. Edges soften. Material transfer leaves faint streaks. That’s abrasive and adhesive wear—surface damage from sliding contact and friction heat. It’s gradual. In 24/7 production, that wear can accelerate by roughly a third compared to intermittent runs because friction cycles never stop, but the mechanism stays the same: surface loss, not structural collapse.
Now look at a punch that’s been bottom bending thick plate near its tonnage ceiling. You won’t always see heavy wear. Sometimes the surface looks fine. But at the corner radius—where geometry concentrates stress—you’ll find hairline cracks running perpendicular to the load. That’s impact fatigue: repeated high compressive loads with tensile rebound at the surface. Micro-cracks initiate, then link. One shift they’re invisible. The next, the tip is gone.
But averages hide peaks.
Exceed rated tonnage by even 20 percent and tool life can be cut in half. Not because the surface wore twice as fast, but because peak stress crossed the fracture toughness threshold. Hardness slows abrasion. It does nothing to stop a crack once the stress intensity at that tip exceeds what the alloy can absorb.
If your heaviest gauge jobs live in that peak zone, why would you optimize for surface wear at all?
Imagine a tool rated—on paper—for a certain load based on air bending mild steel. The force is distributed across the die shoulders. The punch tip sees contact, yes, but the material is mostly supported by geometry. Hardness helps here. It resists galling. It keeps edges crisp. A slightly brittle tool can survive because the stress amplitude stays below its fracture limit.
Switch to coining half-inch stainless.
Now the punch is driving material into plastic deformation through the full thickness. Tonnage can jump to several multiples of air bending. The contact patch narrows. The compressive load at the tip spikes, and when the ram retracts, elastic springback in the workpiece tugs at the punch surface, introducing tensile components right where cracks like to start.
High hardness under those conditions is a double-edged blade. It resists indentation, yes. But it lowers fracture toughness—the ability of a material to resist crack propagation under stress. Once a micro-crack forms, a hard, brittle matrix gives it a clean highway.
A tougher alloy in that same ring may show early nose deformation. The punch didn’t mushroom catastrophically; it crept. That creep is energy absorbed plastically instead of stored elastically. Energy dissipated, not weaponized.
So ask yourself: are you running featherweight air bends all week with a single heavyweight job on Friday, or is Friday your real business?
Take that punch tip under a microscope after fast-cycle work on high-strength low-alloy steel. Friction heat can locally harden the workpiece surface by measurable margins—double-digit percentage increases aren’t fantasy under rapid cycling. That hardened strip acts like sandpaper against the punch. Meanwhile, the punch’s own martensitic structure—hard, body-centered tetragonal crystals formed during quenching—carries high internal stresses.
Each heavy cycle loads those crystals in compression. On release, tensile stresses spike at the surface. Dislocations—line defects in the crystal lattice—pile up at grain boundaries. In a tougher steel, those boundaries can blunt or deflect a crack. In a very hard chromoly pushed toward 60 HRC, carbide particles and rigid grain boundaries can become crack initiators.
The first micro-crack is microscopic. The second links. Fracture mechanics calls it stress intensity factor; on the floor, we call it “it let go.”
Now add misalignment. I’ve watched improperly aligned punches lose noticeable sharpness in a hundred cycles on hard stainless. That’s not an alloy problem; that’s setup. Even the toughest steel can’t save you from uneven load concentrating on one corner. But once alignment is correct, material choice decides whether that concentrated stress yields a burr—or a break.
At the atomic level, toughness is the capacity to blunt a crack tip by plastic deformation. Hardness is resistance to indentation. Under extreme tonnage-per-foot, crack blunting keeps your tool in the fight. Indentation resistance just keeps it pretty until the day it isn’t.
If fracture toughness is the real insurance policy against heavyweight loads, then the question shifts: what alloys fight in that weight class without turning every overload into shrapnel?
So which alloys actually survive heavyweight bending without turning your brake into a grenade?
Not the ones with the flashiest brochures.
Between soft, gummy carbon steels that wear like chalk and ultra-hard chromoly pushed to vanity-level hardness sits a middle class: D2, A2, T10, and well-processed 42CrMo. Not champions in every metric. But in the right weight class, they win on cost-per-stroke—the only title that pays the rent.
Profit doesn’t care what alloy name is etched on the shank. It cares how many cycles you get before regrind, how often you flirt with fracture, and whether your heaviest gauge jobs live near that peak-stress cliff we just walked up to.
This is where the myth starts to crack.
Take a shop running 10-foot sections of 304 stainless all week. Tensile strength jumps roughly 50 percent over mild steel, so your tonnage-per-foot climbs with it. Now imagine they quote the job assuming air-bend math on mild steel, then scale up without adjusting die width. They’re closer to the ceiling than they think. I’ve seen it happen.
Chromoly hardened aggressively for wear will resist galling at first. The edge stays sharp. The punch looks beautiful. Then the peaks show up—the momentary overload from a tighter V-die, a harder batch of stainless, a slight misalignment. But averages hide peaks.
D2 and A2 behave differently. D2 brings high wear resistance from its chromium carbides but, when heat treated sanely—not vanity-hard—it keeps usable fracture toughness. A2 gives up a bit of wear resistance for better dimensional stability and impact tolerance. In long stainless runs where abrasion and cyclic load both matter, that balance means fewer micro-cracks linking into a catastrophic split.
And here’s the part sales reps don’t price in: if your stainless runs are eating edges alive, and a tougher low-alloy tool survives 20 percent longer with half the shrapnel risk, the math flips. Even if it needs slightly more frequent regrinds, the cost-per-stroke drops because you’re not scrapping a shattered punch at 2 a.m.
Now ask the uncomfortable question: what happens when that “stainless” is Type 201 instead of 304, and tonnage jumps again?
Imagine a tool rated—on paper—for a certain load based on air bending mild steel. Then the job shifts: narrower die, thicker gauge, maybe a tensile bump you didn’t plan for. The tonnage-per-foot creeps upward, and suddenly you’re operating in a heavier weight class than your tooling was trained for.
T10 is a high-carbon tool steel. It can be hardened high, holds an edge well, and it’s affordable. 42CrMo—classic chromoly—offers strength and decent toughness, especially when tempered properly. On a spec sheet, 42CrMo often looks like the “stronger” choice.
But strength isn’t the same as fracture toughness.
Push 42CrMo toward higher hardness to chase wear resistance, and its impact tolerance drops. Under repeated peak loads, especially in bottom bending thicker plate, that drop shows up as corner cracking rather than gradual wear. I’ve seen it happen. The punch didn’t mushroom; it split.
T10, kept at a slightly lower but still “good enough” hardness, may wear a touch faster in abrasive scenarios. But if your real risk is peak-stress fracture—not slow abrasion—then that extra hardness is cosmetic armor. The tougher setup absorbs energy instead of reflecting it back into a crack tip.
Good enough hardness that survives is superior to perfect hardness that explodes.
Of course, all of this assumes you can maintain the edge economically once it does wear down.
Tool life isn’t just how long it lasts in the brake. It’s how many clean regrinds you get before geometry drifts or micro-cracks resurface.
D2 and A2, when properly heat treated, grind predictably. Carbide distribution is uniform enough that you don’t chase soft spots across the edge. T10 is straightforward—less alloy complexity, fewer surprises at the wheel. That matters on a busy floor where downtime bleeds cash.
Over-hardened chromoly can be temperamental. Residual stresses from aggressive heat treatment make regrinding a gamble; remove material unevenly and you can release stress that was quietly sitting there, waiting. A tiny crack you never saw becomes visible after the grind. I’ve seen it happen.
And here’s the quiet advantage: tougher low-alloy steels tolerate minor grinding errors without turning into stress concentrators. They forgive. In a world where alignment isn’t perfect and operators aren’t robots, forgiveness lowers shrapnel risk more than another two points of HRC ever will.
Which leads to the question that matters more than the alloy name stamped on the side: if two tools are made from the same steel, why does one survive and the other fail under identical loads?
Two punches. Same 42CrMo bar heat. Same hardness on the certificate. Same press brake, same 3/8-inch stainless job. One ran six months and came back for a clean regrind. The other shed a crescent of steel across the die space on a Tuesday night. I’ve seen it happen.
The alloy didn’t change. The load didn’t change. What changed was what you couldn’t read on the brochure: how deep the hardness went, how the surface was treated, and how that hardened skin met the core underneath. When failure starts at the surface—and it usually does under cyclic bending—the chemistry matters less than the architecture. So what exactly in that architecture decides whether the edge wears down politely or leaves shrapnel?
Picture a cross-section under a microscope. A through-hardened tool—quenched and tempered properly—shows a fairly uniform hardness from surface to core. Not identical, but consistent. The whole body shares the load, and when it yields, it yields gradually. You get mushrooming, edge rounding, warning signs.
Now take an induction-hardened punch. The surface might test at 58–60 HRC, but the case depth is often under 2 millimeters. Under that is a softer, tougher core. On paper, that sounds ideal: hard skin for wear, ductile center for impact. In light-gauge air bending, it works.
Shift to heavy-gauge bottom bending, high tonnage per foot, and cyclic peak loads. The surface layer is martensitic—hard and brittle. The core flexes microscopically under load. That mismatch creates shear stress right at the interface. After enough cycles, tiny cracks form parallel to the surface. Then a segment lifts off. That’s spalling—surface delamination driven by cyclic shear. And when that brittle shell lets go, it doesn’t peel like paint. It ejects.
A shallow case in a heavyweight job is a weight-class mismatch. The outer shell takes the hit, the core moves differently, and the interface becomes the crack highway. The punch didn’t mushroom. It shed fragments.
Through-hardening avoids that interface, but it comes with its own trade-off: if you push hardness too high—think H13 cranked to the high 50s HRC—you lose fracture toughness everywhere, not just at the surface. Now the entire cross-section behaves like that brittle shell. The failure mode shifts from spalling to full-body cracking. Different path. Same shrapnel risk.
So if induction is a thin helmet and through-hardening can turn the whole skull brittle, is there a middle ground that doesn’t lie about its weight class?
Laser hardening works differently. Instead of heating the entire tool or relying on electromagnetic penetration depth like induction, it uses a controlled laser beam to austenitize a defined surface band, then self-quenches into the bulk material. On common steels like 4140 or 4130, you can reach roughly 58–62 HRC at the surface with controlled case depth and minimal distortion—often under a thousandth of an inch on short sections, and a few hundredths over long lengths if managed properly.
That precision matters in press brake tooling, where straightness over ten feet decides whether your tonnage is evenly distributed or concentrated at one corner.
But here’s the part brochures whisper: case depth is still finite. You’re still creating a gradient—hard outside, tougher inside. The difference is control. Laser allows you to tailor the depth and width of the hardened zone to match expected contact stress. For precision air bending and moderate bottom bending, that can reduce wear without creating the abrupt hardness cliff common in shallow induction cases.
It’s not magic. In a true heavyweight scenario—narrow V-dies, high-strength plate, repeated bottoming—if the hardened layer is too thin relative to contact stress depth, you recreate the same delamination risk. Physics doesn’t negotiate.
Where laser earns its keep is distortion control and repeatability. Less post-heat warping means fewer alignment-induced peak loads. And remember, but averages hide peaks. If a distorted tool creates local overload, you’re back to crack initiation at one corner, regardless of alloy.
So laser hardening can be the best of both worlds—if the case depth matches the stress field and the base steel retains real fracture toughness. Otherwise, it’s just a prettier helmet.
Which brings us to something most buyers ignore because it doesn’t have a Rockwell number attached.
Run your fingernail across two new punches. One is ground clean, fine finish along the bend line. The other shows faint grinding marks perpendicular to load. Both measure 56 HRC. Under load, they behave differently.
Those microscopic ridges act like stress concentrators. They increase friction against the sheet, which raises local temperature at the contact zone. Heat softens the very surface you paid to harden. Then galling starts—material transfer from sheet to tool. Now you’ve created high spots that amplify contact stress on the next stroke.
Friction is force. Extra force means higher effective tonnage per foot. Higher tonnage means deeper stress penetration into the tool face. And suddenly that carefully engineered case depth isn’t enough.
A smoother surface lowers coefficient of friction, reduces heat generation, and spreads contact more evenly. That lowers peak stress, which lowers crack initiation probability. Same steel. Same hardness. Different surface integrity. Different cost-per-stroke.
I’ve watched shops chase alloy upgrades when what they really had was a grinding discipline problem.
Surface finish doesn’t sound heroic. It doesn’t win trade-show arguments. But in the math that matters—how many strokes before regrind, how many regrinds before scrap—it shifts the curve. And when you multiply that over thousands of cycles on your heaviest gauge jobs, the profit gap shows up in downtime avoided and emergency replacements not ordered.
So if heat treatment depth sets the internal stress story and surface finish sets the contact story, what does that do to your regrind intervals, your distortion corrections, and your real cost-per-stroke when the job mix turns ugly?
You want to know how case depth and surface finish turn into dollars, not lab reports.
If you’re evaluating tooling and machine combinations for higher tonnage or mixed-material production, it helps to look at detailed specifications rather than marketing summaries. For technical data on bending systems, CNC control capabilities, and application ranges in heavy-duty sheet metal work, you can download the relevant brochures and specification sheets here: Download the technical brochures and specification documents. These materials from CN-HAWE outline CNC-based bending solutions developed with dedicated R&D support, giving you concrete parameters to compare against your own cost-per-bend calculations.
Here’s how it actually plays out on a brake running heavy gauge. A shallow hardened layer under high tonnage per foot starts micro-cracking earlier, which means you hit your first regrind sooner. Every regrind removes material, changes die opening geometry, and forces a setup correction. If distortion was already baked in during heat treat, you’re shimming and tweaking to get even contact again. That’s not metallurgy anymore. That’s a machine parked while a $200-an-hour asset waits for you to chase a thousandth across ten feet.
Cost-per-bend is purchase price divided by total successful bends before scrap, plus the cost of every interruption along the way.
Now layer in surface integrity. A rougher grind increases friction, which increases effective tonnage, which drives stress deeper than your engineered case depth. Regrinds come faster. Galling builds high spots. Those high spots concentrate load and accelerate crack initiation. But averages hide peaks. One localized overload on a distorted tool can eat a week of projected life in a single shift. I’ve seen it happen.
So the question stops being “What Rockwell did I buy?” and becomes “How many strokes do I get between interventions, and what does each intervention cost me in lost throughput?”
If the next step is to speak with the team directly, Contact us fits naturally here.
The most expensive tool in your rack isn’t the one with the highest invoice.
It’s the one that snaps at 3 p.m. during a 500-part run in 3/8-inch plate, when the replacement is in another building and the custom die you paired with it cost four grand. Imagine a tool rated—on paper—for a certain load based on air bending mild steel. Now put it into coining high-strength material at near machine capacity. Full penetration. Zero springback. Maximum tonnage. You’ve shifted weight classes without admitting it.
When a brittle, high-hardness tool fails mid-run, you don’t just lose the tool. You lose schedule. You risk scrapping partially formed parts. If it was a custom profile, you’re not amortizing that cost over years anymore; you’re eating it in one ugly week. Cost-per-bend explodes because the denominator—successful bends—collapsed.
And if your shop runs long bends, remember this: doubling bend length doubles required tonnage. No alloy cheats that math. If the machine is near its limit, every tool is fighting in the heavyweight division whether it likes it or not. In that arena, fracture toughness isn’t a luxury. It’s survival.
So why would anyone pay 40% more for a “premium” material?
Sometimes it does.
If that premium buys you deeper, properly matched hardening with a tough core—meaning regrind intervals stretch from, say, every 20,000 strokes to every 35,000 in a high-volume hypothetical—your downtime per month drops. Fewer tool pulls. Fewer realignments. Fewer chances to introduce setup error that creates peak loads. Over hundreds of thousands of bends, that can offset a higher invoice quickly.
But here’s the trap: if the premium mostly buys higher surface hardness without proportional fracture toughness, and you’re running mixed jobs—air bending today, bottom bending tomorrow, maybe coining on Friday—you may shorten life under peak conditions. The punch didn’t mushroom. It fractured. Now your 40% premium delivered fewer total strokes than a tougher, slightly softer alternative.
Cost-per-stroke doesn’t care about marketing tiers.
The premium pays when it extends stable production time in your heaviest gauge work. It bleeds you when it chases hardness numbers that don’t survive peak tonnage per foot. I’ve watched shops learn that lesson the loud way.
Which brings up the darlings of the brochure crowd.
Carbide is a scalpel.
In thin, repeatable air bending at controlled loads, it holds edge geometry beautifully. Minimal wear. Predictable angles. Long intervals between maintenance. In that weight class, it’s a champion.
Move it into high-tonnage bottom bending or coining on thick plate, and you’re asking a glass hammer to swing like forged steel. Carbide’s compressive strength is enormous. Its fracture toughness is not. One misalignment. One unexpected overload from a warped sheet or slight crowning error. Shrapnel risk. I’ve seen it happen.
Coatings tell a similar story. A low-friction coating reduces galling and heat, which can legitimately extend life by lowering effective tonnage. That helps your cost-per-bend. But if the substrate underneath lacks toughness for your peak loads, the coating becomes decorative armor over a brittle core. When the base cracks, the coating goes with it.
So the real calculation isn’t “Is chromoly king?” or “Is carbide elite?”
It’s this: given your maximum tonnage per foot, your longest bends, and your ugliest material mix, which tool survives the peaks often enough to deliver the lowest cost-per-bend over a year?
That’s the only championship belt that pays your bills.
You don’t pick tooling by alloy chart. You pick it by the ugliest job that pays your rent.
Most shops can’t answer a simple question: what is the highest tonnage-per-foot we actually hit in a normal month, not on a brochure test but on a real run with our real mix of parts? Until you know that, you’re arguing about hardness like it’s a personality trait. This framework forces you to start where tools actually die—at peak load—and work backward to the material that survives those peaks slowly instead of explosively.
So where do those peaks come from in your shop?
Pull a year of jobs. Not revenue—material and thickness.
Mild steel formulas assume about 60,000 PSI tensile strength. That’s the baseline behind most tonnage charts. Now look at how often you bend stainless, abrasion-resistant plate, or high-strength structural grades. The adjustment is simple in principle: multiply base tonnage by actual tensile divided by 60,000. If your stainless sits closer to 90,000 PSI, you just inflated tonnage by 1.5× for the same thickness and die opening.
That multiplier is quiet on paper. It is violent at the punch tip.
A shop that says, “We mostly run mild,” but sneaks in two days a week of high-strength work has already shifted weight classes without admitting it. Those days set your shrapnel risk, not the easy Tuesdays. I’ve seen it happen.
So the first diagnostic isn’t “What alloy is king?” It’s “What percentage of our strokes are in the heavyweight division?” Because if even 20% of your annual volume lives at 1.5× to 2× baseline tonnage, that tail wags the tooling dog.
But material alone doesn’t explain the real spikes, does it?
Now we quantify the punches you’re actually throwing.
Start with standard air bending tonnage per foot for your common thickness and V-opening. Then layer in what the formulas usually hide: method factor and die choice.
Air bending is your 1.0× baseline. Bottom bending can push 5×. Coining can exceed 10×. Narrow a V-die below the typical 6–8× thickness rule and tonnage climbs fast—sometimes exponentially for heavy gauges. Shops chasing tight radii on thick plate often create their own overload condition and then blame the alloy when something cracks.
Imagine a tool rated—on paper—for a certain load based on air bending mild steel. Now run bottom bending on high-strength material in a tight die. You didn’t exceed the catalog limit by a little. You changed the physics of the fight.
Here’s the practical move: build a simple table for your top ten jobs by volume. For each, list:
Calculate tons per foot. Then multiply by bend length to see total machine load. Highlight the top three peak tonnage-per-foot conditions. Those are your design loads. Everything else is noise.
But once you know the peaks, how do you translate that into material choice without drifting back into hardness worship?
“Best” is not the hardest alloy that survives your highest theoretical load.
“Best” is the material that, under your identified peak tonnage-per-foot, degrades in a way that protects throughput.
If you run mostly air bending in mild steel with rare spikes, a higher-hardness tool with moderate toughness may stretch regrind intervals and win on cost-per-stroke. The punch didn’t mushroom. It wore slowly. Predictably. That’s profitable in a lightweight division.
If your table shows frequent heavy-gauge bottom bending near machine capacity, you’re living in the heavyweight class. Here, fracture toughness—the ability to absorb energy without cracking—matters more than squeezing out a few extra Rockwell points. A slightly softer, tougher core that deforms before it fractures buys you warning. It may mushroom. It may need regrind sooner. But it doesn’t explode mid-run and take a $4,000 custom die with it. I’ve seen it happen.
So you define acceptable failure mode first. Slow wear? Minor edge rollover? Fine. Catastrophic split under peak load? Unacceptable. Then you evaluate materials not by brochure tier, but by how they behave at your highlighted tonnage-per-foot.
And here’s the non-obvious shift: your “workshop DNA” is not your average job. It’s your repeatable peaks. The alloy that wins is the one whose fracture toughness matches those peaks closely enough to survive them, yet whose hardness is just high enough to keep wear economical across your actual volume.
Profitability isn’t a championship belt for the hardest steel in the rack.
It’s cost-per-stroke in your weight class.


